Getting Started with Alias
If your service supports OpenID Connect for login and signup already, or is built on a framework that has an OpenID Connect integration available, integrating Alias with your service is often as simple as configuring Alias as a supported OpenID Connect provider.
Note
You'll need a developer account to integrate with Alias.
Integration Details
The integration configuration process varies by service, but you'll typically need information about the OpenID Connect provider (Alias), and the details of the API client you've registered with Alias for your service.
OpenID Connect Provider Details
Some OpenID Connect integrations can use a provider configuration document to automatically discover information about a provider. Alias' provider configuration can be found at /.well-known/openid-configuration.
If your integration doesn't support this, you'll need to enter some information manually.
| Field | Value |
|---|---|
| Issuer | https://projectalias.com |
| Authorization Endpoint | https://projectalias.com/oauth2/authorize |
| Token Endpoint | https://projectalias.com/api/oauth2/token |
| JSON Web Key Set | https://projectalias.com/.well-known/jwks.json |
| User Info Endpoint | https://projectalias.com/api/oidc/userinfo |
API Client Details
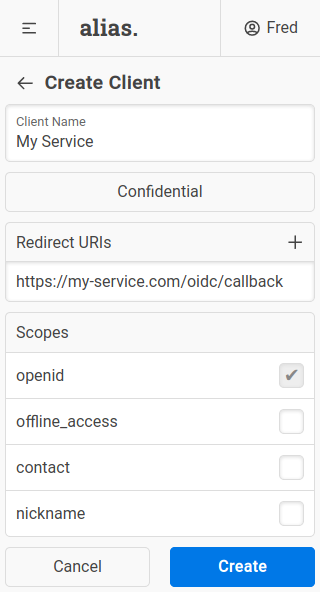
You can create a client for your service in the "Clients" section of the Alias UI.
In most cases you should create a confidential client. If your service doesn't have a secure backend that can protect a client secret, you'll need to create a public client instead. Note that public clients are more limited than confidential clients.
The redirect URIs for your service will depend on the OpenID Connect integration, so check the relevant documentation if you are unsure.
Finally, you'll need to select the scopes your service needs. For auth-only integrations, this is usually just the (mandatory) openid scope. If you want to contact users via Alias you'll need the offline_access and contact scopes as well.
Once you've created the client, the client details (client ID, client secret, etc.) can be used to finish configuring your OpenID Connect integration.
Example
Synapse (Matrix Homeserver)
Synapse - the Matrix reference homeserver - can be configured to use OpenID Connect for user authentication. When users sign in for the first time they will be prompted to pick a username, which will become the localpart of their user ID. See the Synapse OpenID Connect documentation for more details.
Note that these instructions assume Synapse v1.27.0 or greater.
Create an API client for your Synapse install with the following details:
| Field | Value |
|---|---|
| Type | Confidential |
| RedirectURIs | https://<YOUR_HOMESERVER_DOMAIN>/_synapse/client/oidc/callback |
| Scopes | openid |
And update your Synapse homeserver.yaml to add Alias as an OIDC provider:
oidc_providers:

  - idp_id: alias
    idp_name: Alias
    issuer: https://projectalias.com
    client_id: <YOUR_CLIENT_ID>
    client_secret: <YOUR_CLIENT_SECRET>
If you wish, you can also disable the built in username/password based authentication:
enable_registration: false
password_config:
  enabled: false